YOUR LANDSCAPE PHOTOGRAPHY IS SCREAMING FOR CLOUDS!
YES, CLOUDY SKIES ARE GOOD.
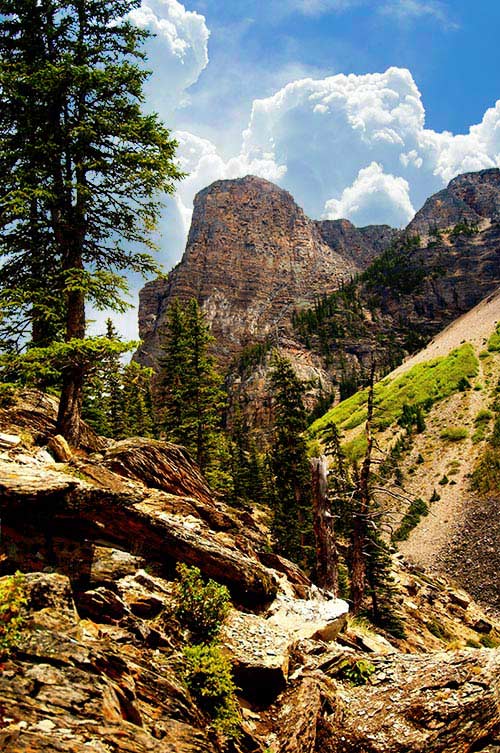
It is true- all great landscape photography needs clouds! Clouds in landscape photos add drama, dimension and context for your photos.
I read someone’s take on ‘cloudless skies in landscape photography’, and they called them “bald skies.” I like that! I also like bald heads, but actual bald skies- as in cloudless skies – not so much. A dramatic landscape or scenic photograph needs dramatic skies! NO bald skies for your landscape photos. Promise yourself this. Even if you have to add a dramatic sky in Photoshop afterwards, your images need interesting sky features – or in technical photographer’s terms – clouds.
Wispy mare’s tails, puffy summer cumulus clouds, brooding stormy skies, even a vapour trail from a passing plane, add more interest and dynamism than a clear blue (bald) cloudless sky.
Most of the time we associate clouds with bad weather, sadness and overall not goodness! However in landscape photography you NEED clouds.
A sunset or sunrise without clouds is a boring red sky. A scenic canyon without clouds is a big hole in the ground. A mountain without clouds is a big pointy rock. Clouds – you gotta have them in your outdoor landscape and scenic photos. I think the only time you don’t want clouds is at night when you are shooting the Northern Lights – Aurora Borealis, or the Milky Way, or any other night time phenomena.
But during the day, send it those clouds! They add interest, contrast, and texture, as well as providing an additional wow factor.
Here is an example to show you what I mean (click to see the large images):
OK, SO HOW DO I ‘PLOP’ THOSE CLOUDS INTO MY IMAGE?
You may remember back in the day, someone actually used the RENDER>CLOUDS filter in Photoshop to add a pseudo-cloud effect to images. This use caught on and soon there were lots of strange looking clouds turning up in photos. Sometimes this can be effective but more often, unless under the skilled and nuanced hand of an artist, these rendered clouds look pretty fake. Rendered Photoshop clouds are good for a lot of things but unfortunately clouds isn’t one of them!
There are a number of ways to plop in actual clouds.
This method will get you started and it needs no special skill other than knowing where some tools are in Photoshop. You know your layers palette has a drop down box on the top for Blending Options? We’ll use this, and the wonderful eraser tool. It’s so simple which is why I say plop them in. Get ready to PLOP away!
Yes there are more sophisticated and probably “better” ways to add clouds to an image, but I want to you try this so you can really appreciate how powerful clouds can be in really MAKING an image. So this way is fast and easy. But you’ll need to have white skies in your original image. If you can’t immediately find any white skies images in your photo library (well…you must be very good already 🙂 ) I have created a small starter pack of white skies photos and some random cloud images to plop in. Download the Starter Cloud Pack here – go ahead, its’ free! (If you want a whopping 50 different types of hi-res and huge file size cloud images, you can get my Pro Cloud Pack here for just 12.99.). Want even more dramatic skies? Get the Hi-res Dramatic Skies Pack, also 12.99
THE PLOP METHOD
1) Open your white sky primary image.
2) Open your cloudy sky image
3) Drag your sky onto your primary image. For now, make it a bit transparent so you can place the cloud layer artfully in your image. (This is the PLOP!)
4) With this cloud layer active, select DARKEN from the layer Blending Modes dropdown, See how it almost gets invisible anywhere where the sky touches the land. This makes it easier to erase the bits that overlap.
5) Speaking of erasers, grab your eraser tool and change the size to something suitable for your image. Make sure it’s a moderately soft brush but not too soft, a little on the harder side is good. Now erase the parts of the sky layer that are encroaching on the land. Depending on your image using Darken may mean that you don’t really have to erase much at all.
7) You can always play with the opacity of the sky layer, as well as alter the hue and saturation to blend better with the lighting on your original image.
8) When you’re happy with the results, SAVE! You can save as a PSD layered file for future experimenting or save flattened if you want to print it.
Now you know how to plop in a high impact sky!
If your primary image has a flat horizon with few protruding objects such as mountains, trees or buildings, you may just need to use the eraser to fade the sky into the land. But I find Darken is a quick and easy way to remove extra sky overlap.
Photoshop 2020 Auto Sky Replacement
The latest release (as of October 2020) contains a fantastic new feature – automatic one click sky replacement. Read about how it works and when you should use it here. Automatic Sky Replacement in Photoshop
Now isn’t this better?


